Wednesday, December 15, 2010

Final Project: Touch and Emotion through Wearable Technology


VIEW PROJECT VIDEO.

READ FULL PAPER

Our final project has been a whirlwind of a learning experience - from translating hard-wired Arduino circuits to a soft circuit on clothing, to learning how to sew from scratch. As a recap, our project is a wearable shirt that fires lights up the sleeve and neck upon human contact. It is a step forward from our Sketch Two project, where we are focusing more on the interaction between human touch and the form of the shirt. As human touch has particular emotions attached to it, we are exploring how this can be shown visually and poetically. 


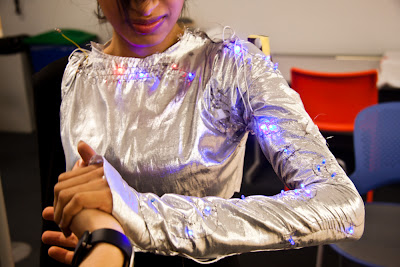
There are a few different interactions the shirt portrays. First, when human contact is made on the hand, the lights fire up the sleeve and neck and began to pulse. As long as there is skin contact the lights remain pulsing. Once the contact stops, the lights slowly stop pulsing, one section at a time, starting from the wrist and ending at the neck. As most of the lights are blue, we have sewn in red lights at the neck area to represent blushing on the face. The other interaction is focused on the shoulder. Whether the wearer is touched intentionally on the shoulder or is unintentionally bumped, the lights pulse briefly. However, when the wearer is repeatedly bumped or contacted on the shoulder, such as in a crowded area, the lights rapidly flicker for that moment as if the person is startled or overwhelmed. 

The touch interaction from the hand contact is done by sewing conductive fabric onto the fabric on the hand. This is connected to the Power (5V) and Pin 0 threads sewn onto the shirt, and connected to the Arduino which is placed at the back of the shirt. The contact on the shoulder is done by making a pressure switch with sponge and conductive fabric. When pressure is applied and the conductive fabric touches through the switch, the circuit completes and the lights turn on. 


The shirt has a unique and fitted aesthetic. We have emphasized on an asymmetrical form where the neckline extends past the shoulder up to the height of the wearer's ear, giving a slightly futuristic feel. It is composed of a few layers. The first layer is a reflective silver fabric where the soft circuit and LED lights are sewn into the left arm and torso along the neckline. The arm has an additional layer of the silver fabric to help diffuse the LED's for a softer, more delicate aesthetic of the blinking lights. Another layer of a thinly knit, translucent black fabric has been added to the arm that helps to balance the rest of the shirt and neck made of black leather-like material, which ultimately holds the form. The raised neck is also comprised of the leather material, the reflective silver material to cast the lights onto the face which overlays a stiffer white material to hold the shape. 


We went through an iterative process to get the shirt to its final form and functionality. First, we cut up an old shirt of the wearer's to get an approximate pattern. We then traced it onto paper and pinned the pieces to the wearer to get an idea of how each piece needed to be shaped an cut. We then translated this to a brown leather-like material to prototype it. At the same time, we made the silver and black under layers, adjusting the size along the way. After making many marks on the prototype, we translated it to the current black leather-like material to achieve the current form. We also added a zipper on the side and  black stretchy fabric along the arm to allow for some flexibility. 


Our technical implementation also went through a variety of stages. First, we had the entire circuit sewn into the shirt, with wires only connecting to the Arduino when they needed to. This resulted in some finicky circuits as we realized that many of the main lines to be wired to the Arduino were sewn right underneath the armpit area. This area was most the susceptible to creasing and causing the conductive thread to come into contact with one another! Consequently, the circuit would be on all the time leaving the sensors useless. We thought of a solution to insulate the conductive thread with fabric glue to prevent the short circuiting, however this ended up making the circuit stop working completely. We ended up having to take some of the shirt apart and hardwire most of the circuit to ensure its functionality. As a result, we have a beautifully constructed wearable garment that reacts upon human contact.   


In future iterations we are looking to make this garment more easily wearable for the wearer, and also make the circuits more permanent. We would also like to do some user research by wearing the garment in social situations, interacting with people, and getting their reactions and insights after experiencing the garment. We look forward to further improving our design. 

Wednesday, November 24, 2010

Sketch Two: Your Touch Powers My Heart

For this project we combined some of our concepts mentioned previously with the intention of moving it forward over the next few weeks. We took to the idea of the hair lights reacting to human touch but integrated it into a shirt, that would later incorporate elements of the defence suit. The longer there is skin contact, the more LED's light up and pulse, starting from the bottom of the shirt and moving upwards.


The way it works is that we've sewn a basic circuit with two wires and a resistor into a glove. When the two ends of the wires come into contact with a conductive material (skin in this case), the LED's in the shirt are activated. We've sewn four sets of LED's into the shirt (20 in total, scattered sporadically for visual asymmetry). When the wearer first comes into contact with skin, the first set lights up and pulses. After a few pulses (which can be adjusted in the Arduino code), the second set of LED's light up, and so forth.

Hard circuit of how four sets of LED's light up sequentially, which was translated onto clothing

Relationship between the glove as a sensor and LED's on shirt as an output.

LED's fully lit up upon human skin contact


We wanted to explore the idea of intimacy - in this case it is more direct because the longer the touch, the more lights pulse and the shirt becomes more attractive. Going forward, we are also incorporating elements of the defence suit to play with the boundaries of defence and intimacy. For example, when the wearer becomes wary the defence suit becomes activated, but when he or she becomes more comfortable with particular human touch the shirt begins to light up. This is only an assumption the that person becomes comfortable only after becoming wary, so we would have to play with the idea. We did, however, work with some possible forms for the defence suit and will be focusing on the movement aspect and overall aesthetics of the wearable piece in the coming weeks.

Exploration of the form for the defence suit (shoulders and back of neck are enlarged)

Sketch Two Concepts

For Sketch Two we came up with three concepts that involve wearable technology. Below is our model, Jacques, proudly displaying all the concepts, as well as a description of the concepts. 


Concept One: Fiber-Optic Hair Lights


The first concept looks at the idea of communication through movement, inspired by how animals communicate through body language and color. It would connect different types of movements and use lit-up fiber optics in the hair as an output. Depending on the speed and patterns of one's movements, certain colors would light up in the hair as an effect of the movement. We also wanted to play with the idea of intimacy. In this case, if the wearer comes into contact with another person, the LED's embedded in the hairpiece would brighten or flare up. 

To realize this idea technically, we would use accelerometers to detect the direction and speed of movement, incorporate RGB LED's and fiber-optics into a hairpiece, and use a glove which would act as a touch sensor for detecting human contact (skin is conductive, so skin contact would complete the switch circuit sewn onto the glove).


Concept Two: Furry Night Friend


This concept takes the form of a furry friend that sits on the shoulder to act as a companion for those who are afraid of the dark. Embedded into a scarf, the creature responds to a dark environment via a light sensor that detects this. The creature would then light up (through LED's) and softly purr (through vibration sensors, which would ideally activate upon human touch), allowing for both the wearer and the creature to be sources of comfort for one another. 


Concept Three: Defence Suit


Inspired by defence mechanisms that animals take when sensing danger (such as embedding themselves into a tree bark of similar color), this concept explores the idea of the personal bubble through the form of a suit that expands as an act of defence. When proximity or loud noises are sensed, the suit would expand from its current shape to perk up and make the wearer look bigger and more intimidating, yet remaining sculptural and elegant. Areas to consider for changing in shape are the shoulders, neck, and elbows, where extra material can be added for an inflated effect. 

Realization of this idea would require motors that move wires underneath the suit to facilitate the change in shape. We would also be looking at sound and proximity sensors to detect loud sounds and proximity. We would also need to consider how the user can control these actions to prevent the suit from accidentally going off against their will. We would most likely create a switch where the user can control exactly when the suit inflates.  


Monday, November 15, 2010

Soft Circuit: Beating Heart

In preparation for our sketch two project we were encouraged to test out soft circuits. Our team designed a circuit that included LED's in the shape of a heart, along with a light sensor. We designed it so that the darker the environment, the faster the heart beats. This could simulate a person who is scared of the dark. Conductive thread was used to complete the circuit. Below are some images and a video of our soft circuit.


Hard-wired Arduino board with basic light sensor circuit, which was later translated into a wearable garment.


Wires connecting from light sensor to 5V, and resistor to ground.
We sewed a parallel circuit, where the negative side is on the inside and positive on the outside. Negative leg of LED is connected to ground, and positive leg to pin 13.

We made a pocket to house the battery and Arduino board, so we would not have to be wired up to a computer. 

The Arduino code has been uploaded onto the board, and is connected to the battery, and is ready to go. 


Tuesday, October 26, 2010

Sketch One Outcome: Fairy Companion

We presented our Sketch One projects yesterday. To recap, our project is inspired from Peter Pan's Tinkerbell. Because she is so small she is only able to elicit one emotion at a time. Hence, the goal is for the user to move in a way that allows the fairy to become comfortable enough to stay close by, otherwise it will scare away quickly.

Our group's project worked out about as expected, with a couple additional features. We managed to get an animation of the fairy going, as well as get it to change its color to red when flying away from the participant (to depict a scared/angry emotion). Here is a video demonstration of our project:


Also, here are parts of our max patches:

We used bounding boxes to read the size and location of the user, so we could offset the fairy.

Centroids were drawn to get the centre point of the camera image.


We added in an animation of the fairy (done in flash) and calculated the point at which it should start flying away (based on the user's speed and size). Before this, we were using a white ball to test out the interactions.


Series of "if" statements to determine the fairy's location.
Made the fairy turn red when flying away, otherwise it stayed yellow.

Mirrored the camera image, so the user can accurately see their movements on the same side.


This is the final outcome - the fairy is staying close and liking the user in this case!

We did consider incorporating multiple fairies and participants, however due to the complexity of the bounding boxes and centroids we kept it to a single fairy and participant. However, it would be a goal if we were to move this project forward in the future. 

Monday, October 11, 2010

Sketch 1: Flushing Out Concept

For this project, we decided to take our footsteps concept (where glowing footsteps would be projected onto the floor from up above, acting as an imaginary companion to the participant) into a playful experience with fairies. This is mainly due to the nature of the defined setup - because the projector would be facing the screen and the camera would be facing the participant, we needed to tweak our concept to fit the environmental requirements. 

We came up with other ideas as well that might be implementable later on: 

Mischievous shadows 
- Inspired by Peter Pan's shadow
- 2 people in separate rooms, interacting at first with their own shadows, which subtly changes into the other person's shadow


2D --> 3D Depiction
- Inspired by Pixar's Night and Day short
- Environment where a message or image is only shown through the participant's silhouette, so it will require working together with others to solve the "puzzle" 


Virtual Paintball
- Gestural-based interactions, where participants can throw balls of light towards each other and use objects around them to block movements (almost like virtual paintball) 


For our project, we were inspired by Peter Pan's fiesty sidekick, Tinkerbell. We will create an environment where each participant will have their own Tinkerbell to interact with. However, since Tinkerbell is so small that she only able to elicit one emotion at a time, each motion elicited by the person will have a direct effect on the fairy's reaction. For example, slow movements will encourage the fairy to come closer and be more comfortable with the person, whereas quick movements will scare the fairy away and will perhaps make it angry (visualized by changing colors). We will also take size into consideration, where the fairies will optimally interact with children. If adults are involved, then they might have to crouch down to appear smaller and more approachable. 

We will, in particular, be detecting:

- Speed of participant and fairy's movements
- Size of participant
- Color of fairies

Here is a sketch of the general schematic:


Monday, October 4, 2010

Ideation - Sketch 1

Our design team sat down together today to brainstorm possible ideas for a responsive environment that would involve the basic components of a camera, projector, and screen. 

In our ideas we wanted to ensure that there was quality in the interaction, that incorporated unique senses. First, we brainstormed possible variables that could be detected. We threw out terms such as motion, distance, frequency, speed, sound, temperature, size and quantity. We took these further and applied them to possible concepts. Below are some of the concepts we came up with:


Concept 1:  Needy Room

This concept was taking into account a direct impact of the projection based on human movement. A projector would be placed overhead, projecting glowing balls of light on the ground. The more people clustered in a space, the bigger the blobs get. If there are areas in the space that are empty, a sound element could be incorporated that would subtly indicate that the space is lonely and needs more people. 


Concept 2: Footstep Companion

This idea would consist of a projector up above that displays glowing footsteps on the ground. A camera would track the movements of the participants, which would affect the movement of the footsteps. These footsteps would act as an invisible  companion, presumably to a child, by walking beside him or her. Where the footsteps could also skip ahead or walk using unique patterns, forcing the participant to follow it and turning the nature of interactions into more of a game.


Concept 3: Imitating Subconscious Actions through Fiber-Optics

This idea was inspired by the tendency of natural, subtle movements, such as lightly tapping feet on the ground, or rubbing one's arm upon feeling cold. We thought it would be interesting to exaggerate a subtle movement in order to anticipate the upcoming action. An example that was brought up was the technique of drawing comics. If the artist was to draw a character sitting up, he or she would first have picture the character slightly leaning back before actually getting up. This lead to a tangible concept, where through fiber optics, we would use the current movement of the participants to exaggerate and almost "fast forward" the action to create an anticipatory environment. 


Sunday, October 3, 2010

Welcome!

Hello, friends! This is my blog for a class I am really excited about this term, called Body Interface. Here, you will find our process and documentation for upcoming projects, as well as my thoughts about embodiment. On the right hand side you can access the blog entries of my team mates. Keep checking back for more posts!


-Azmina